Want to fix the VPN Service Not Starting in Windows 11 problem? If your answer is YES then you are in the right place.
VPN is a service that helps your device to connect to the server anywhere in the world. This will allow you to hide your IP address and browsing history from an ISP (Internet Service Provider) and local government.
NPN services are also useful for accessing software or websites that are not available in your region. However, there arse some Windows 11 users experiencing difficulties while using the VPN such as “VPN Not Working” and “VPN Service Not Starting”.
Fortunately, there are some troubleshooting methods that you can use to fix the VPN Service Not Starting or Not Working problem.
So without any further ado let’s see:
How to Fix the VPN Service Not Starting in Windows 11
If you are encountering the VPN Service Not Starting in Windows 11 then here are some troubleshooting methods that you can use to fix this problem instead of returning to normal connection.
Method 1: Check Your Internet Connection
Because VPN service completely relies on the internet connection to connect your device to another server. If there is an issue with your internet connection then VPN will also not work properly.
In that case, check if your device is connected to the internet. If your device is already connected to the internet connection then try checking the connection speed by using an internet speed tester.
If you are on a wireless connection then try connecting your device using an ethernet cable to get stable and high-speed internet.
Method 2: Disable and Enable the VPN
If the first method does not fix your problem then you may try disabling and enabling the VPN from your Windows 11 settings. This will give VPN services a fresh start and fix all minor issues. Here is how you can do it:
- Open Windows settings by pressing the Windows + I keys together.
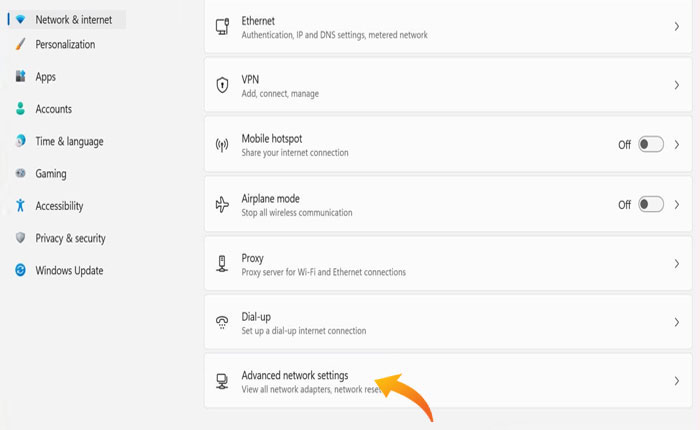
- Under the settings go to the “Network & Internet” tab.
- Under this tab click on the “Advance Settings” option.

- Now, from the Network Adepter section, Disable the VPN.
- Wait for a minute and Enable it once again.
- That’s it, now go and check if your problem is fixed or not.
Method 3: Update Network Adapters
It is possible that you are unable to use the VPN service because you have an outdated version of Network Adapters installed in your system. In that case, you can fix this problem by simply updating the Network Adapters.
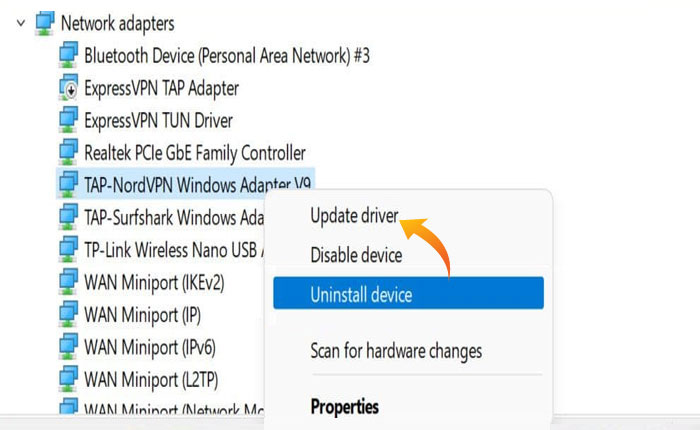
- Right-click on Windows Bar and select Device Manage from the menu.
- Here you will see all drivers installed in your device, look for the Network Adapter and click to expand it.
- Find the VPN’s Windows Adapter and right-click on it.
- Select Update Driver from the menu.

- From the pop-up menu select the Automatic installation option.
- Once you do that, it will automatically scan the driver version and replace it with the latest version.
- That’s it.
Method 4: Try AccessingAnother Website
Some website admins use algorithms to block user access with a VPN connection. You may be unable to access a specific website because it has detected an active VPN service that you are using.
In that case, you can try accessing another website to check if the website detects the VPN or if there is something else causing this problem.
If you can access other websites then you must try using the better version of the VPN service or move to the paid version if you are using free VPN services.
Method 5: Connect to Another Server
If you are encountering issues connecting to the specific location server then you should try using another location server or performing multiple attempts to establish the connection.
That’s it, by using these methods you can fix the VPN Service Not Starting in Windows 11 problem. If not then you should contact customer support of the VPN service you are using for expert assistance.

